Maintaining Gluten-Free Sourdough Starter
All three of us have been enjoying our new sourdough bread. We even baked more loaves of bread yesterday! This time, Wyatt got to complete all of the baking steps with me.

I daresay that our bread was even better this time around!
But as it often goes with new pets, the care and feeding of the pet is on the parent. In this case, taking care of the sourdough is on me. It had been so long since I had kept sourdough starter alive that I had forgotten how I used to do it. I went online to jog my memory, and boy did those searches jog it. If you search online for "how to maintain sourdough starter," you will find more exquisitely detailed posts than you would have ever thought imaginable. Amateur bread baking, sourdough in particular, is a thing, and most people who choose to maintain a starter and then write about it tend to have strong opinions about the process.
But here's the problem with strong opinions about maintaining sourdough starter: everyone's kitchen is different. The temperature of the kitchen, the temperature of the water, and the exact composition of the water changes from house to house. What works perfectly for someone else may not work for me, or you. Exactly how much to feed a starter and when to feed it is dependent on a lot of variables that I am not interested in attempting to control. I want to keep my sourdough starter alive, so I feed it regularly. But I figure that since I was able to grow it on my counter over a few days, thanks to a little bit of care and a lot of benign neglect, it will be no big deal to start another one if this one dies.
If you have never maintained a sourdough culture before, you can read about the process in traditional sourdough bread here. This series of posts on Phickle, Sourdough Starter School, is really informative. The photos are also great, but remember that like all other gluten-free baking projects, gluten-free sourdough starter looks different from traditional sourdough.
Even though traditional and gluten-free sourdough batters look different, the bubbles of happy microbes are the same in both. The more bubbles I see and the more popping I hear, the more active my starter is. If there are almost no bubbles, my starter has either just been fed or may need to be fed again. And after I have fed my starter, I give it a sniff. The smell is always very mild. But by the time of the next feeding, the smell is much stronger and more sour. Sometimes there's even a layer of liquid on top of the starter. A strong sour smell and this liquid are signs that my starter is hungry for fresh flour and water.
There seems to be no consensus on how often to feed a starter. Sandor Katz recommends daily feeding, and so does David Asher in his cheesemaking book. Amanda Feifer at Phickle is also in the once-a-day camp. But many other people feel strongly that twice a day feedings are necessary. The first few days I had my starter, I fed it once a day, before I went to bed. But I started to notice that by feeding time, it was looking and smelling like it was pretty...hungry. So I started feeding it twice a day: morning and evening. I noticed with twice daily feedings, the starter looked more lively by the end of the day. It's possible, though, that if I had just increased the size of the one feeding, that would have fixed the problem.
But enough discussion. Here's my process so far for maintaining sourdough starter:
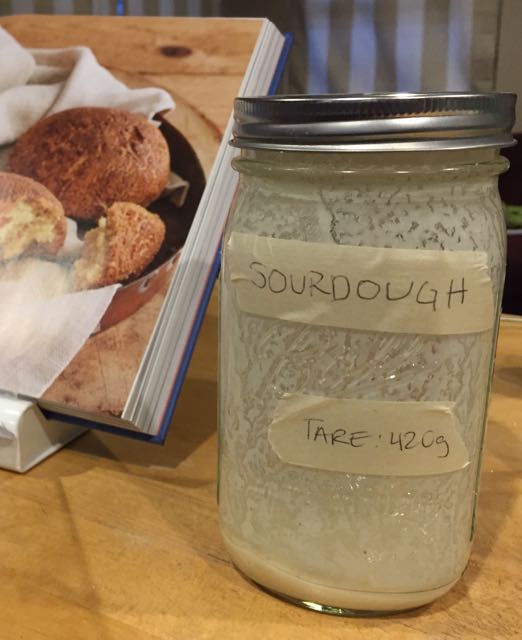
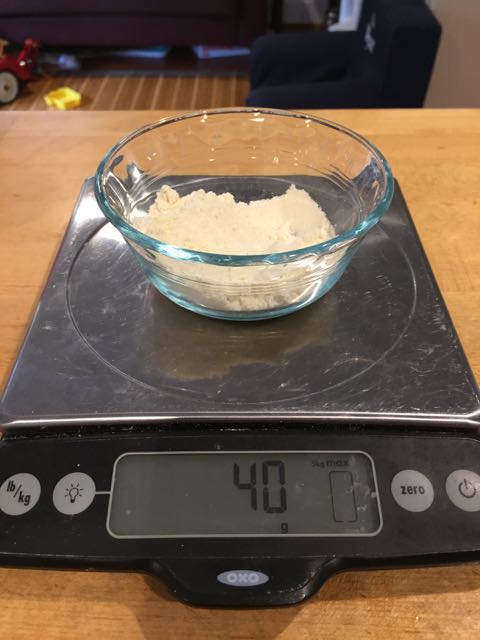
At the first feeding to maintain the starter, I took a clean, empty, quart sized mason jar. I measured the weight of it, in grams, and wrote that tare weight on a piece of masking tape, and stuck that on the jar.
I put the jar on the scale, zeroed the scale, and added 20g of sourdough starter to the jar.
I measured 40g of flour (be sure to feed the starter gluten-free flour mix, NOT the grain-free one in American Classics Reinvented), dumped that in the jar with the starter. I measured 40g of non-chlorinated, room-temperature water, and I dumped that in the jar with the starter and the flour. I mixed all of it up vigorously, and screwed the lid on LOOSELY.
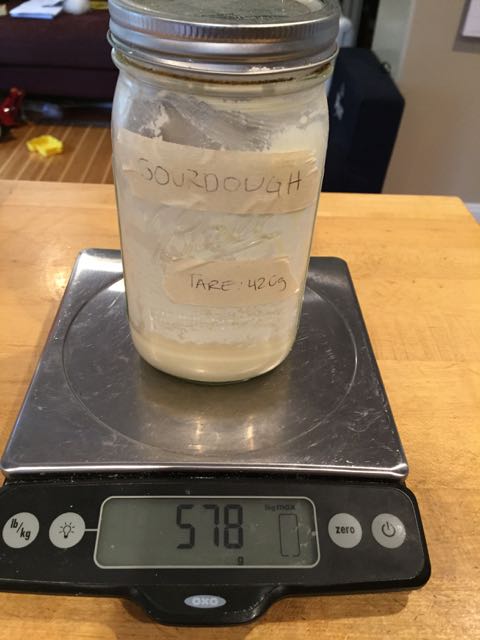
In the evening, I weighed the jar and removed all but 20g of the sourdough starter. This was easy to do, because I already knew how much my jar weighs when it is empty. (Pretend your empty jar weighs 420g . Put the jar on the scale and keep removing starter until the scale reads 440g. Now you have 20g of starter in the jar.) I then added 40g of flour and 40g of non-chlorinated, room-temperature water, mixed it all vigorously, and screwed the lid back on LOOSELY.
Then I just repeated this process--keeping 20g of starter, and adding twice that amount of flour and of water at every feeding. I composted the starter I removed. The thing about sourdough is that you have to remove some of the starter at every feeding or else you and your kitchen will quickly become overwhelmed by sourdough starter. Also, removing excess starter helps to keep the microbe population in check and control the level of sour in your baked goods.
A few feedings in advance of when I would be baking again, I began to build up the size of my starter by increasing the size of the feedings. I kept 20g of starter, but fed it 60g of flour and 60g of water. And at the next feeding, I kept 30g of starter and added 90g of flour and 90g of water. At that point, I had more than enough starter for my recipe plus 20g to maintain in the jar.
This week, I'm experimenting with keeping the starter in the fridge. I fed the starter a couple of days ago, let it hang out on the counter for a couple of hours after the feeding, and then I put the jar in the refrigerator. My plan is to take it out of the refrigerator and revive it with a few feedings before our next baking day.