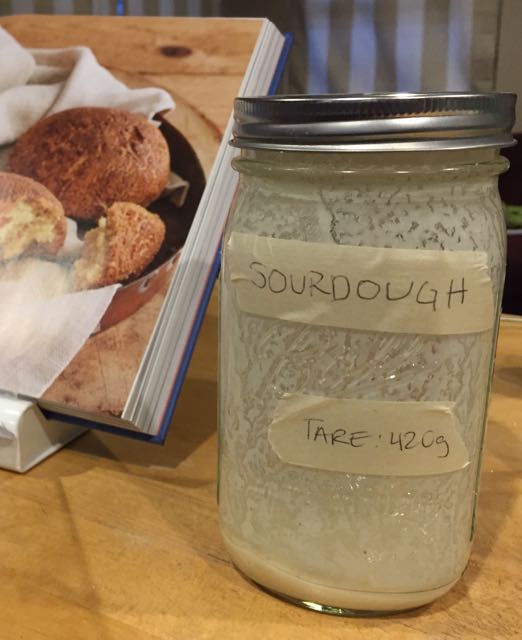
Victorian House in the City

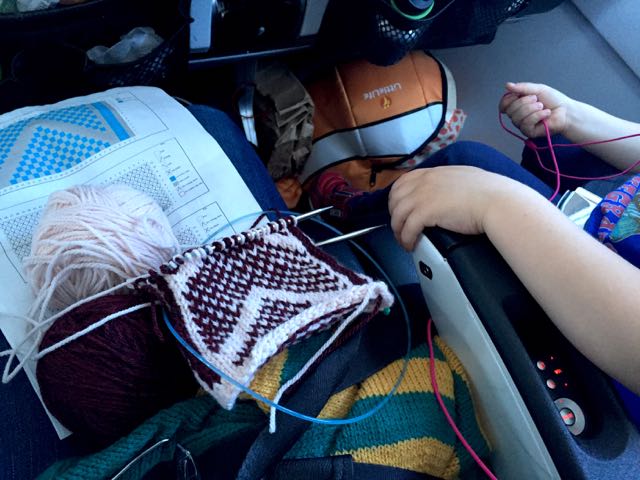
Lately, I have been knitting like it's my job. I am knitting Wyatt's Halloween costume this year, and I started later than I should have. I ordered my yarn at the end of September, which is too late for much measure of comfort in terms of an end of October deadline.

IMG_3732.jpg

During the same time that I've been knitting up a storm, I've been reading Little House on the Prairie aloud to Wyatt at bedtime.* Hearing about the long wagon ride from the Big Woods out to the Prairie, how the family built their home and stable out of raw materials, and how they traveled and kept house in the wild has been absolutely riveting to him. For me, revisiting this story as a parent has given me new respect for every pioneer parent who ever lived. Life was hard.

While Ma and Pa have been felling trees, building a house, cooking over an open fire every day, and ironing their clothes on a bed in their covered wagon,** I've been knitting a Union Suit pattern by Megan Grewal. I chose this pattern because it will work perfectly for Wyatt's costume, and because it involves several design features I've either never done or never mastered. For example, I've never knitted a garment with legs or a gusset, and I need to practice my buttonholes. 

The yarn I am using is Balance, by O-Wool. I've been challenging myself over the last year to make more responsible choices when buying crafting materials, as well as when buying ready-to-wear clothing and home goods. O-Wool has terrific standards. Owner Jocelyn Tunney offers environmentally responsible, affordable yarn that is made in the United States from certified organic materials. Jocelyn also gave me excellent advice on which color yarn to purchase. I didn't feel like I had time to order a swatch card before actually ordering the yarn, so I emailed her and told her about my project. In my email, I included links to the general color of yarn I wanted to find, and I told her I thought that I should order Graphite, but I wanted to see what she thought. She confirmed that Graphite was the way to go, and it's absolutely perfect in person.

I have just found and ordered the buttons we will use. I think Wyatt will be able to help me paint them, which should be fun.

Wyatt checks every day to see my progress on his suit. He is starting to understand that knitting takes time (for me anyway). And he knows that when I finish the legs, I'll move on to the arms, then the butt flap, and then the button bands. His anticipation is great, and I love that he's gaining appreciation for the work that goes into creating things. 

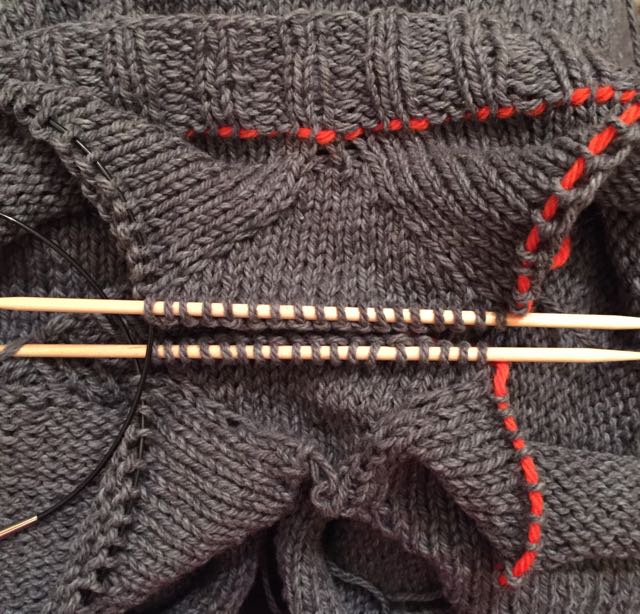
The other night, after I put Wyatt to bed, I sat grafting together the two halves of the gusset on the suit. That little patch connecting the two leg holes reminded me of the many pairs of store-bought tights I've worn, ripped, and thrown away in my life. I imagined having to sit and knit a pair of stockings because someone in my family absolutely needed them. And there would be so many other other garments everyone would need. Knitting was probably the easiest and most restful activity a pioneer homemaking woman would have during her exhausting day, and there would be so much of it to do.

Reading about the Ingalls family during a week of furious-knitting-by-choice has made me so grateful I live with modern conveniences. We have running water, electricity and a washing machine! And we get to choose whether to knit our sweaters and socks, sew our clothes and sheets, or hunt, grow and cook our own food. Modern life may be more complicated in some ways than pioneer life was. But I prefer the luxury of making choices about what to buy, what to make, and researching sustainable options over having to make everything myself.

*We had already read Little House in the Big Woods a few times and were ready to try another one in the series. When I read these books to Wyatt, I do some editing on the fly. I omit the scenes, songs, and references that are not appropriate for him right now. 

**The ironing really gets me. Was this ironing out of pride? Or habit? Good, crisp Christian values, maybe? They saw no one else for days and days, and yet, Ma ironed everything. I feel like ironing would be the last thing I'd do if I were resettling, but maybe that's because I only iron when I absolutely have to.


Really Good Butternut Squash Soup

It seems like everyone loves autumn and all the winter squash it brings. Everyone except me. I do like kabocha squash and some other pumpkins, but if I'm honest, that's about it.

I'd prefer to let the squash lovers keep their acorns, butternuts and especially their spaghettis, for themselves. But cooking for a somewhat vegetarian household in the fall and winter means winter squash will have to grace our table at some point, especially since we are guaranteed to get some in our CSA box

In fact, last Wednesday, we unpacked our first butternut squash of the season. I groaned inwardly as I stuck it on the counter, next to the bowl of onions. I figured it would stand there awkwardly for a few weeks until I finally, and grumpily, got around to slaughtering it, cooking it, and then vaguely avoiding it on my plate. One of my complaints about squash (especially butternut) is that to me, it's just sweet and has no depth of flavor. Roasting it helps, but that's not enough. I cannot give up on learning to like squash, though, for the reasons I just mentioned, so I remain open to new recipes.

Last week, I listened to the Local Mouthful podcast where Joy Manning and Marisa McClellan discussed how much they were looking forward to winter squash season and how they prepare their squash. I was totally unmoved by their descriptions of roasted squash with butter. But Joy Manning's suggestion of how to prepare a flavorful squash soup grabbed my attention. Get this: She cooks the squash strings and seeds in the soup pot until they develop into a deep fond on the bottom of the pan, and then removes the extra strings and seeds before going forward with the rest of the soup. What a great way to develop good flavor! Yesterday, Wyatt and I tried it. It made a great butternut squash soup. And I don't mean "great for butternut squash soup," but actually great soup that happens to be made with butternut squash.  

Here's what we did:

I peeled and cut the squash. Wyatt helped to cut the pieces smaller, but squash is hard to cut (yet another of it's charming qualities), so we worked together. We also sautéed some onions until they caramelized. Ours actually got a little burnt, and then Wyatt ate a third of them, but I was aiming for one large onion, thinly sliced and then caramelized. I think that would have been ideal for this recipe. I removed the onions from the soup pot, added a little more olive oil, and then scooped the seeds and strings of the squash into the pot and let them cook there until a fond developed on the bottom of the pan. Once there was a deep-colored fond, I removed the remaining loose squash strings and all the seeds, sautéed some fresh sage for a few seconds, added the squash, deglazed the pan with some white wine, and poured in a quart of broth. We let the pot simmer until the squash was soft, and then we put the soup in the blender in batches. We added salt and pepper to taste, and we added some cream before serving, but you could easily leave out the cream if you prefer.

I'm pretty excited that I'm actually looking forward to the leftovers of this soup. And if you have some clever and delicious squash preparations you'd like to share, I'd love to hear them. Squash season is just beginning, after all.

Mozzarella, Fast and Slow

"I just need to finish building this helicopter, and then I can make cheese."

We've been working on mozzarella for the last week, following the recipes in David Asher's The Art of Natural Cheesemaking

Or, I should say, we have mostly been following the recipes. Our first mozzarella attempt was last Monday, and it was our first cheese fail. "Fast mozzarella" is cooked and ready to stretch in about an hour, and it has a very mild, sweet milky flavor because it has not fermented at all. But we didn't learn what it tastes like last Monday because the curd never set in our cheese pot.

Luckily for me (and probably unfortunately for him), David Asher has proven to be the kindest, most supportive cookbook author ever. Last Monday, because we were in the middle of an email conversation about his slow mozzarella recipe, I told him about our fast mozzarella fail. He very gently asked whether I had forgotten to add the rennet. I hadn't, as you can see from this photo (also, I should have used a spoon, not a whisk), so the failure remained mysterious until yesterday when I remembered that I had used tap water to dilute the rennet. I also recalled that at the time, Wyatt had asked me why I wasn't using bottled water, like I had the other times we made cheese (and as David says in his book to use). I had told Wyatt it probably didn't matter whether we used tap water with the fast mozzarella because there was no kefir culture in the fast mozzarella recipe. I was so wrong. A little research yesterday proved that chlorine in water makes rennet ineffective, and while I have been unable to confirm whether whether chloramine (which is in our tap water) has the same effect, I'm pretty sure that it must.

We tried the fast mozzarella again on Thursday, with improved results. But the curd stayed pretty soft. That time, I had used the remaining tiny bit of a bottle of water and topped off the quarter cup I needed for rennet dilution with tap water. Even though our finished cheese slumped, we had decent success and a huge amount of fun stretching the cheese into crazy string cheese shapes.

Our next recipe to try was slow mozzarella. This was the recipe I had emailed David about initially, because the recipe states it takes between 8-12 hours to complete, and you have to test the curd for stretchiness every hour. There was no way Wyatt and I would be able to hang with this project for 12 hours. If it took the full 12 hours, Wyatt would be in bed by the time the fun of stretching came along. And paying attention to cheese every hour for 12 hours, not knowing when we'd have to stretch it, was too much uncertainty. Fortunately, David had a suggestion. He said we could prepare the cheese, ferment it in its whey in the refrigerator for 24 hours, and then knead, stretch and shape it. That plan was totally doable.

Because we wanted the cheese to be ready to stretch around 2:30 or 3:00 pm on Monday, we needed to get it into the refrigerator by Sunday afternoon around the same time. And because the rest of the process would take about 4 hours, we would have to start the cheese around 10:00 am on Sunday. So that's what we did, and it worked perfectly.

I have to note, though, that Wyatt has become more selective about the parts of cheesemaking he wants to do. This time, he decided he'd rather go outside to play than dissolve and pour in rennet, and he didn't really care about cutting the curd or stirring the pot of curds every 5 minutes for an hour. So I did those steps. The cheese forms, on the other hand, were new, so he definitely wanted to fill those. And he definitely wanted to remove the cheese from the forms and put them into their bath of whey. And because he knew how much fun the cheese stretching was, he had no problem setting aside Monday afternoon for stretching and shaping cheese.

We could have attempted to make tender mozzarella balls, but we decided it was much more fun to overwork the curd and make string cheese. So we made Oaxacan string cheese and Majdouli, a Middle Eastern string cheese that incorporates nigella seeds.

The flavor of the slow mozzarella is much, much better than the fast mozzarella. It's still mild, but it's more complex and less sweet. We ate some for dessert with apples and honey, and it was so good. 

But the lessons for me from this mozzarella adventure are that I should heed the recommendations of my assistant and always use bottled water to dilute the rennet.


It's Not About the Pancakes

This morning we had our first school day breakfast meltdown: "No, Dad. I don't want yogurt or Bircher muësli. I want pancakes! Why can't I have pancakes? We have some in the freezer."

I was getting dressed as I listened to all of this begin to go down. Why no pancakes? Good question, I thought to myself. Pancakes are delicious. We had them for breakfast on Sunday, and there are indeed some in the freezer. But that's the thing. They are in the freezer and not ready to eat. And more than that, we don't have pancakes for breakfast on weekdays. 

I cheered silently for Marc as I listened to him stay firm and steady. He said to Wyatt, "I hear you. You want pancakes. You really want pancakes. And I totally get that they would taste really good. But it is a school day, and we are not having them. You may have yogurt or Bircher muësli. I'll put both in your bowl so you can choose." 

As Marc returned from carrying breakfast to the table, I joined him and Wyatt in the kitchen. Wyatt was wailing on the floor, and it looked like there was a decent chance that he wasn't going to touch his breakfast before we had to leave for school. But Marc and I stayed calm, relatively unruffled, and pretty empathetic (for 7:00 am on a school day) because we were prepared for this flare-up. We consciously do things the same way every day with Wyatt. Keeping a strong rhythm (or routine) makes it very easy for us to spot when something is off-balance, and it gives us the confidence to stay firm and on track when big emotions overwhelm our little kid. This morning, we didn't know what Wyatt's "sads" were about, but we could tell they definitely weren't about the pancakes. 

Our family would be lost without a daily rhythm, and this morning, I was so unbelievably thankful for Christina Perez, Wyatt's teacher and our parent coach, for helping us to establish ours. I remember, when Wyatt was much younger, how we struggled with the feeling of losing our autonomy and independence once we tied ourselves to a "schedule." But immersing ourselves in a daily rhythm was one of the smartest things we ever did as parents because we all know what's coming next and roughly when it will happen. It just makes everything so much easier. On a Sunday, for example, Wyatt (with less and less assistance) gets up, gets dressed, makes his bed, and brushes his teeth. There's a little time for him to play while Marc or I prepare breakfast. After breakfast, we clean up, and then there's time to play or have an adventure, and a midmorning snack. Lunch happens around 12-12:30 pm. After lunch, if we eat at home, there's a short period of quiet time, and then there is more free time until snack around 3:00 pm. Dinner happens around 5-5:30 pm, and then we slide into Wyatt's bedtime routine.

By now, we are so used to this routine, that when we deviate from it occasionally, we all recognize the change as something special, and it's very easy to get right back on track.

Wyatt eventually ate his yogurt and Bircher muësli for breakfast, and we confirmed it wasn't about the pancakes when we learned that he wasn't excited to go to school this morning. We were 7 minutes late leaving the house, but that's a pretty good recovery considering our original 20-minute delay to the start of breakfast. 

Finding freedom through routine sounds crazy, but that's where we are right now. And thank goodness for all of that.


A Visit With Willy Claflin, Storyteller

Do you know Willy Claflin? If not, you should.

If you will be in the San Francisco Bay Area this weekend, you can see him perform live this Sunday, September 27, at 2:00 pm at Freight and Salvage in Berkeley. You can also see him live at Berkwood Hedge School's Telling Tales Storytelling Festival in Berkeley on October 17. The Freight and Salvage show is geared towards adults; the Berkwood Hedge School event is all ages. Willy will also be performing in the Austin, Texas public schools in a couple of weeks. If you can't make any of those performances, you can see some of his work here or on YouTube.

Willy Claflin was the first professional storyteller I ever heard. And he made such an impression on my elementary school-age self that over thirty years later, I recognized him at our gate at Logan Airport when Wyatt and I were flying back to San Francisco this August. But it's not like I did my usual thing where I think to myself, "Oh! That looks like so-and-so," and then wonder for a few days whether it was, in fact, so-and-so. This time I actually gathered my nerve and said something like, "Excuse me. Is it possible you performed at my elementary school?" To which he replied, "Yes! Where did you go to school?" And then we introduced ourselves, and the conversation took off from there. I don't exactly remember everything either of us said because I was very, very busy being starstruck fangirl at the time. 

Willy and I chatted again at baggage claim in San Francisco. He invited me to email him to find out about upcoming performance dates, so I did. A couple of email volleys later, I asked him if Wyatt and I could stop by his studio space one afternoon. To my delight, he happily agreed to see us.

As kids, we looked forward, like nothing else, to Willy Claflin's performances with his puppet friends (including Maynard Moose), fractured fairy tales and hilariously engaging songs. And you'd be wrong if you thought that by my age, I'd have outgrown my school girl off-the-charts excitement and anticipation of getting to see him. True to form, for the last week, I have been waiting for Wednesday, today, the day Wyatt and I were scheduled to visit Willy's studio.

In preparation for this visit, I assembled my Willy Claflin items so that I could ask him to sign them. The record, "Stones Along The Shore," is an album of his Wyatt and I rescued a few months ago from a bin at The Record Store in West Portal.  And in anticipation of our studio visit, my parents, who save everything important, sent me his cassette recordings from the eighties. Wyatt decided he wanted to make Willy a present, so he rolled a beeswax candle. I tucked all of these items, along with a sharpie, into a tote bag.

After I picked Wyatt up at school this afternoon, we walked the few blocks to Willy's studio. When we saw the moose-shaped door knocker, we knew we were in the right place. I lifted Wyatt up so he could reach the moose and knock on the door. Willy opened the door, and for the next 40 minutes, we enjoyed the most wonderful visit with the kind, smart, hilarious, engaging man I remember from childhood. We also met many of Willy's friends.

We met Maynard Moose, and his back-up moose, "Boris with a B." We also met Little Moose, who is the heroine of the book, The Little Moose Who Couldn't Go to Sleep.

We met Ms. Moo. She has a big voice and tells stories with strong morals.

We also met Gorf, who is a bullfrog flyswatter percussionist.

Riboculous is an inappropriate raccoon who told Wyatt a story about how once he had lots of cupcakes, and they were so delicious because they were made with sugar, "nature's most perfect food." Riboculous said his mom told him share the cupcakes, so he did, but once he had shared with all his friends, he had no more left to eat. Riboculous concluded by saying that the moral of the story was not to share. Willy chided him for that inappropriate conclusion and put him firmly back on his shelf.

We also met Dr. Al, who is a humorless tie-wearing alligator, as well as Buzzy, Willy's well-loved bear, who is in his sixties.

During our visit, I learned that Willy is an award-winning author. He has written The Uglified Ducky and The Little Moose Who Couldn't Go To Sleep, among others

I also learned that he is recording his fourth music album and is starting a long children's novel. Between all of this and his performance schedule, I find it hard to believe he's even semi-retired, but he claims to be.

We left Willy's studio with so many presents, including a copy of the album he recorded with his son, Brian Claflin, called In Yonder's Wood. It is a stunning recording of traditional tunes, mostly narrative ballads, some from the British Isles and some from Appalachia and the American West. 


Today was worth every moment of anticipation I had pinned on it. It's not often that someone can live up to a decades-old childhood memory. Today, Willy Claflin did exactly that, and I can honestly say that he's even more wonderful than I had remembered.


More Feta Fun: Creamy Feta

"Oops. Mom. I smushed that little part off. But it was by accident, and it's only a small piece. So it's okay, right? And I can probably eat it, now, right?"

Did you know there was such a thing as creamy feta? I didn't. According to David Asher in Chapter 15 of The Art of Natural Cheesemaking, creamy feta is a softer version of feta, made using a lactic curd, like a chèvre, instead of the firmer full-rennet curd that we made last week. Creamy feta is commonly called Bulgarian feta but is now labeled as Bulgarian white cheese because of the Protected Designation of Origin (PDO) protecting the name feta. If the controversy surrounding feta interests you, you can read more about the "feta wars" here. Because "Bulgarian white cheese" is at best an utterly uninspiring name, I'll refer to what we made as "creamy feta."

Making creamy feta was a pretty leisurely experience. The recipe said it would take about an hour over three days to make, and that would have been about right if I hadn't had any help. For us, it probably took closer to 90 minutes or so over four days, which was very doable.

Here's what we did:

Like our first feta, we made some active kefir culture, and strained it. We heated the raw goat's milk, added the culture and a very tiny dose of rennet dissolved in water. Then we let the covered pot sit out on the counter for a day.

On the second day, we filled our forms with the curds that had formed. Unfortunately, I did not have enough of the proper size and shape forms for this recipe, so we used two crottin forms and two Valençay forms. I'm sure we broke a variety of rules by making feta in the shape of a pyramid, but because I have no idea what those rules are, I'm not too worried about it. We mixed a 7% brine. As the cheeses drained, we flipped them once.

On the third day, we salted the cheeses and let them dry, and we attempted a whey ricotta. The yield was very small and the flavor was very strong. The ricotta was also much wetter than our previous whey ricotta. We preferred the whey ricotta from the firm feta over the one from this recipe.

On the fourth day, we put the cheese in the brine. Unlike our firm feta, this cheese seems to want to float. The recipe says if that happens, to weigh it down. Wyatt managed to wedge a couple of pieces of cheese into the jar in such a way that they are holding each other under the brine. I have no idea what he did, but I hope it holds because I wasn't able to find something in our kitchen to use as a cheese weight.

Now we must wait two weeks for the cheese to age. We're looking forward to tasting the two fetas side-by-side to see whether there's one we prefer. 

Friday Fermentation Class

A couple of weeks ago, my friend, Maja, texted me saying, "Hey, I'm keen to do a fermentation session with you, do you think we could do that one Friday?" I responded with a resounding, "Yes!"

I love fermentation. And I get excited when my favorite people get into it, too. One of Maja's goals was to choose a project with vegetables that her son would enjoy, and this is the kind of challenge I like to tackle.

My gateway ferments were yogurt, kefir, and sourdough. Vegetables came later. It took a friend of mine telling me about her adventures in making sauerkraut, several months of thinking about doing it myself, and a few false starts of my own before fermented vegetables became a regular part of our life. But I have now been fermenting vegetables for the better part of the last three years and they truly are a part of life for all of us, Wyatt included. He happily eats a variety of fermented vegetables at lunch, dinner, and sometimes both if we don't have much time to cook. He started eating my purple sauerkraut when he was just over two years old, and he seemed to enjoy it from the first bite. But some people, adults and kids alike, tend to avoid the the tangy and sometimes sour flavors that are the signature of fermented foods. As the diet of many Americans has changed over the years, the flavors of fermented vegetables have become unfamiliar. As a result, fermented vegetables may take some getting used to.

In our house, we firmly believe that your tastes can, and do, change over time. I learned to like beets, Wyatt learned to like cantaloupe (he doesn't remember it, though), and one day, Marc may hate parsnips less. Wyatt got the best real life example of the phenomenon of changing tastes in preschool last year. One of his classmates disliked avocados. Disliked as in she really, seriously hated avocados. But according to the custom in the preschool, everyone was required to take a (sometimes very tiny) "no thank you" bite of everything offered at a meal, including the things you don't think you like. Wyatt watched his friend take "no thank you" bites of avocado over their shared preschool career. But one day, his friend took her "no thank you" bite, and much to everyone's surprise, including her own, she actually liked the avocado. She liked it so much that she asked for more, and then even more. This event made a huge impression on Wyatt, and he talked about it for days. After all, it's one thing to be told, "Hey, someday you might really like this food you hate with every molecule of your being," and it's quite another to actually witness when that change happens for your friend.

Keeping in mind Maja's request for an approachable vegetable ferment, I suggested that we start with some fermented radishes and dill carrots. I thought of the radishes thanks to Amanda Feifer's interview on the Local Mouthful podcast. Amanda suggested radishes would be a good first ferment because they're ready to eat in about a week or ten days. I think that in addition to their short fermentation period, radishes are a good first ferment because their flavor changes so much during that week or so. I suggested we also do dill carrots because they're really delicious (imagine the flavor of a cucumber dill pickle combined with the sweetness of a carrot), they take about as much time to ferment as the radishes do, and I was almost out of dill carrots myself.

Maja ordered some fermentation weights and picked up a couple of wide-mouth mason jars. She also got some gorgeous red and orange carrots. I got the radishes and some more carrots, dill, celery seed, and I had the salt, pepper corns and garlic. We were ready to ferment. Here's what we did:

We washed and trimmed the vegetables, and then cut them into the shapes we wanted. Maja is a designer and you can tell just by how she cut and stacked the carrots. We mixed a 5% brine, and then we arranged our vegetables in the jars. Maja's were particularly artful. We added the brine to the jars, put a weight on top, and screwed the lids on loosely. 

I advised Maja to taste the radishes and carrots every day after the first few days to start to notice how the flavors change over time. I told her that for me, around ten days, the salty flavor that has been so prevalent on the vegetables goes away and other flavors start to come through. That's when I call them "done," take off the weight, tighten the lids, and store the jars in the refrigerator for eating.

Recipes:

My recipe for dill carrots is the same as for dill beans, which appears in this post. Just substitute carrots and you've got it (today we omitted the chiles de árbol, but you could include them if you like your carrots spicy).

Fermented Dill Carrots

Ingredients:

  • Enough carrots to fill your jars. Trim and cut into spears or rounds, whatever you like. You don't need to peel them.
  • 1 bunch (or more) of fresh dill. (I've used as much as one bunch per quart jar, but have also used less.)
  • 1-2 tablespoons of black peppercorns per jar
  • About 1/4 teaspoon of celery seed per jar
  • 1-3 peeled garlic cloves per jar (I like more garlic, but you may prefer less)
  • Enough salt and water to make a 5% brine for your jars
  • Fermentation weights, one for each jar. I love Sandy Der's weights.

Directions:

Wash the carrots and the dill. Put the dill fronds into the jars along with the peppercorns,  celery seed, and garlic cloves. Fit the carrot pieces in the jars, as many as you can, in as organized a fashion as you can. Leave about two inches of space between the top of the carrots and the top of the jar. You may need to cut some of the carrots.

Measure 1 liter of water (about 4 1/4 cups) and 50 grams of salt (if you don't have a kitchen scale, for the Real Salt I used, 50 grams amounted to approximately 3 tablespoons of salt) and dissolve the salt in the water. When the salt is dissolved, pour the water into the jar of carrots until the carrots are fully submerged under the brine. Leave about an inch of space between the brine and the top of the jar. (If that wasn't enough brine for your jars, make another batch.) Place a fermentation weight on the top of the carrots in each jar so that the carrots stay under the brine. LOOSELY screw the lid on the jar. Write the date you started the carrots on the jar--grease pencil on the lid or a label made from masking tape work well--and put the jar in a cool corner, out of direct sunlight, to ferment. Check and taste every few days to see how the ferment is progressing and to confirm the carrots remain fully under the brine. Top off the jar with more water if the level drops. Our carrots are usually ready to enjoy in 10 days or so, but that timeframe can shift depending on the time of year and how warm it is in the house.

Fermented Radishes

For radishes, the process is the same as for carrots but with fewer ingredients. All you need is radishes, salt, water, and a sprig of thyme (if you want to add one). Get as many radishes as you need to fill your jars. Wash, trim and cut your radishes. Cut the radishes however you like. I enjoy thin cross-sections, but you could easily do quarters or even whole radishes.  Put the radishes in the jar by themselves or with a sprig of thyme. Pour in 5% brine, top the radishes with a weight (and if some radishes float up to the surface, lay a blanket of a washed cabbage leaf under the weight to keep all the radish slices under the brine). Cover the jar with a loose lid, and label the jar with the date you started them. Place the jar out of direct sunlight in a cool area, and check them every few days to see how they're tasting and to confirm they remain fully under the brine. The radishes should be ready to eat in about 7-10 days. 


My First Handspun Yarn

It took me a few weeks to finish the work I needed to do on the yarn I spun in Massachusetts, but now it's done. Isn't it pretty?

The item that kept from from finishing this project sooner was a niddy-noddy. I know. It's a silly sounding name, and as far as I have found, there is no other word for the device.  I looked to buy one locally, but I couldn't find one, so it was Etsy to the rescue. Here is the niddy-noddy I bought. And this is what it looked like with my yarn wound around it. 

IMG_3512.jpg


The purpose of a niddy-noddy is to allow you to wind yarn, stretching it out at the same time you're measuring it. For example, I used a two-yard noddy-noddy, and when I was done winding my yarn, I counted the loops (33 loops), so I knew I had 66 yards of yarn.

I let the yarn sit on the niddy-noddy overnight.


The next day, I tied the loops together it in four places with undyed yarn (to avoid any color transfer), and then it was time to wash it. The spinning we did during my class was "in the grease," so the wool had never been washed. Here's what the yarn looked like going into the basin:

I washed the yarn four times, gently, in lukewarm water with a little bit of liquid laundry soap. The first three washes, the water was full, and I mean full, of lanolin. The water turned a deep brown. By the third and fourth washes, the sticks and twigs had started to float out of the yarn and the water was less and less brown. Here is what the third wash looked like:


By the fourth wash, the water looked pretty clear, so I knew I was done. I rolled the yarn in a bath towel to get most of the water out, and then I hung the yarn to dry over a doorknob in our laundry area, with the basin under it to catch the drips.


Even though the yarn is at best, inconsistently spun, I'm pretty happy with my first effort. I'm not sure what I'll make with it yet, but I'm happy that I have so much to work with.


Whey Ricotta

"Dad. Guess what? Mom ALMOST let the whey boil over! You should have seen the foam on the top of the pot!"

Before making feta, I did not have a good appreciation of how much of reductive process cheesemaking really is.

IMG_3486.jpg

When I ordered our cheesemaking supplies from The Cheese Connection, the incredibly helpful Kallijah informed me that a gallon of milk makes about a pound of cheese. But what this actually meant in real life was that our gallon of goat's milk made just over a pound of feta, and left about 15 cups of whey. If you're not up on your conversion factors, let me help you out. There are 16 cups in a gallon, so the leftover liquid was only a cup less than our original gallon of milk. I suddenly began to understand why good cheese is so expensive.

And I was left with the question of what to do with all that whey. Fortunately, David Asher anticipated this question and included a chapter on "Whey Cheeses" in The Art of Natural Cheesemaking. In the chapter, David provided a variety of sensible suggestions on how to use whey, and there is a picture of him feeding whey to pigs, and a picture of him watering his garden with whey. Wyatt, a child of the California drought, looks for any opportunity to pour liquid anywhere, so he was in favor of finding a pig to feed, or barring that, pouring the whey on our garden. I, on the other hand, a grown-up involved in a Cheese Project, was in favor of trying to make one of the cheeses with it instead. Eventually Wyatt agreed to make whey ricotta.

As David explained in Chapter 22, Whey Cheeses, "Italian, for 'cooked again,' ricotta refers to the second making of cheese from one batch of milk: the milk is first 'cooked' to make Parmigiano Reggiano or pecorino or some other Italian cheese, and the leftover whey is then 'cooked again' to make ricotta." 

We had just over a half-gallon of whey available to play with, because the rest of it had been used for the brine to age the feta, or I had spilled it on the floor. A half-gallon was about half of the amount of whey required for the "Slow Ricotta" recipe, but I figured we could try the recipe anyway and see what happened. If we only got an ounce or two of ricotta, so be it. It's not like we had a pig starving for whey in our back garden.

Here's what we did:

First, we left the whey to ferment at room temperature for 24 hours. Monday afternoon, we poured the whey into a pot and brought it to a boil. David specifically warned in his recipe to remove the pot from the burner right as the whey comes to a boil so it doesn't boil over. Unfortunately, I forgot for a few minutes that the pot was even on the stove because Wyatt had begun conducting an imaginary orchestra (with they aid of a tinker-toy stick) in Rimsky-Korsakov's "Flight of the Bumblebee" from his San Francisco Symphony Orchestra Concerts for Kids CD. I lost track of the whey, and just as the foam was about to cascade over the rim of the pot, I happened to glance over at the stove, gave a little yelp, and pulled the pot off the burner just in time.

Back on task, we let the whey settle, and sure enough, there were little clouds of ricotta curd that had pulled out of the whey. We strained the ricotta in some cheese cloth and hung it to let it drain and cool.

Once the cheese had drained (and yes, we probably shouldn't have, but we squeezed the hanging cheese just a little bit to move the process along) and cooled, we weighed it, salted it and ate it for dessert with some fruit. I was impressed that we got almost four ounces of ricotta. The cheese was soft, creamy, and thanks to the fermentation step, had a depth of flavor I have never before tasted in ricotta.


Feta-tastic!

"Mom. Can I just please try this? With the salt? PLEASE?"

Originally, I had planned to work through the recipes in David Asher's The Art of Natural Cheesemaking in the order that they appear. But as the rest of North America heads into autumn and cooler temperatures, San Francisco is entering summer. I checked the temperature of our normally chilly garage last week, when temperatures were in the 80s and above, and the garage was over 70 degrees. That's way too warm for aging chèvre, which is the next chapter in the book.

But we were on a roll, and the idea that our project could be stymied by warm weather seemed wrong, or at least unacceptable, to me. I skipped ahead to the chapter fifteen, on feta: "Feta is a cheese that is aged by submerging it in a brine made of its whey. Started as basic rennet curds, feta is defined by this brine-aging. Brine-aged cheeses are most popular in warmer climes, where salty brines preserve cheeses well despite high temperatures and without refrigeration." Perfect!

On Saturday, I bought a gallon of raw goat's milk that had just been delivered to Rainbow. Ideally, we would have started the cheese on Saturday, but Saturday was just too busy. Also, I had forgotten to make the active kefir we would need for our cheesemaking. So on Saturday, I started the kefir that would be ready the next day.

We started the feta on Sunday and finished on Monday. Here's what we did:

On Sunday morning, the kefir was ready, and we were eager to get started. But first, we learned what raw goat's milk tastes like. It's has a pretty distinctive taste, Wyatt said it was like hay. I don't know when he has ever eaten hay, but that's a different issue. He also said he liked the bit that he tried, thought that it tasted nothing like cow's milk, and he added that he probably wouldn't want to actually drink a glass of it. After pouring the milk into the pot, we warmed it, and added the strained, active kefir. We covered the pot to keep the milk at 90 degrees for an hour.

Keeping the pot warm was where I made my first mistake. After reading about how hard it can be to keep the milk warm enough, and how your cheese may fail if the temperature drops too low, I wanted to be sure that the milk stayed warm enough. And as you may have already guessed, I overcompensated. I brought out bath towels to swaddle the pot, and I turned the oven on, to keep the top of the stove warm. By the end of the hour, I measured the temperature of the milk, and it had risen to 99 degrees. This was obviously not ideal, but I rationalized (without any science or research, mind you) that it would probably be fine. I told myself that the pot hadn't been that hot for the whole hour, and I also figured that people in hot places drink kefir, so we should just push on. But before we continued with the recipe, we let the milk cook to 90 degrees, and I turned the oven off.

Once the milk had cooled a bit, we added the rennet that we had dissolved in water, and then we covered and swaddled the milk pot again for an hour. The stove had cooled off by that point, but I checked the temperature of the milk after 30 minutes, and it was 3 degrees warmer than it was when we started. So I removed some of the towels and uncovered the pot so it could get back to 90 degrees for the rest of the hour.

Next, we checked for a clean break of the curd, and we had one. At this point I was absolutely overjoyed that we actually had curd--its was the first obvious clue that we were on the right track with the recipe. Then we had to cut the curd, which is tricky in a round pot with a regular knife and a 4-year old who wants to do everything himself. But we managed, and the curds that we missed, we just cut them up later as we found them when we were stirring. We poured off the whey, salted the curds, and we set up our cheese press from last week, this time with cheese cloth in it, so we could flip the whole cheese occasionally. It worked perfectly.

We then prepared our salt brine, and I managed to pour a good amount of whey all over the floor. I also splashed some on Wyatt's socks (he loves to add that part of the story). In my defense, our four-cup glass measuring cup pours terribly for some reason, and I had forgotten how badly it pours until I was standing in a puddle of whey. 


After the cheese had been pressed and was cool, we cut the block of cheese (which weighed just over a pound) into four pieces so it would fit in our jar with the brine. We salted the surfaces, and we set the quarters of cheese to dry on the aging mat for 24 hours. We flipped them occasionally so they would keep their shape.

On Monday afternoon, we checked our cheese, and they had lost another tablespoon or so of liquid. We had no idea whether they should dry for longer or not, but we figured they were probably fine to go into the jar of brine. And good news! They sank right to the bottom of the jar, and stayed there. 

We put the jar in the refrigerator, and we now have to wait two weeks before we can try them. As Wyatt said, "Two weeks? That's not so long, right? That's like tomorrow, and then after tomorrow, and then it's two weeks!" He has such a good attitude for making cheese.


Maintaining Gluten-Free Sourdough Starter

All three of us have been enjoying our new sourdough bread. We even baked more loaves of bread yesterday! This time, Wyatt got to complete all of the baking steps with me.

I daresay that our bread was even better this time around!

But as it often goes with new pets, the care and feeding of the pet is on the parent. In this case, taking care of the sourdough is on me. It had been so long since I had kept sourdough starter alive that I had forgotten how I used to do it. I went online to jog my memory, and boy did those searches jog it. If you search online for "how to maintain sourdough starter," you will find more exquisitely detailed posts than you would have ever thought imaginable. Amateur bread baking, sourdough in particular, is a thing, and most people who choose to maintain a starter and then write about it tend to have strong opinions about the process.

But here's the problem with strong opinions about maintaining sourdough starter: everyone's kitchen is different. The temperature of the kitchen, the temperature of the water, and the exact composition of the water changes from house to house. What works perfectly for someone else may not work for me, or you. Exactly how much to feed a starter and when to feed it is dependent on a lot of variables that I am not interested in attempting to control. I want to keep my sourdough starter alive, so I feed it regularly. But I figure that since I was able to grow it on my counter over a few days, thanks to a little bit of care and a lot of benign neglect, it will be no big deal to start another one if this one dies.

If you have never maintained a sourdough culture before, you can read about the process in traditional sourdough bread here.  This series of posts on Phickle, Sourdough Starter School, is really informative. The photos are also great, but remember that like all other gluten-free baking projects, gluten-free sourdough starter looks different from traditional sourdough.

Even though traditional and gluten-free sourdough batters look different, the bubbles of happy microbes are the same in both. The more bubbles I see and the more popping I hear, the more active my starter is. If there are almost no bubbles, my starter has either just been fed or may need to be fed again. And after I have fed my starter, I give it a sniff. The smell is always very mild. But by the time of the next feeding, the smell is much stronger and more sour. Sometimes there's even a layer of liquid on top of the starter. A strong sour smell and this liquid are signs that my starter is hungry for fresh flour and water. 

There seems to be no consensus on how often to feed a starter. Sandor Katz recommends daily feeding, and so does David Asher in his cheesemaking book. Amanda Feifer at Phickle is also in the once-a-day camp. But many other people feel strongly that twice a day feedings are necessary. The first few days I had my starter, I fed it once a day, before I went to bed. But I started to notice that by feeding time, it was looking and smelling like it was pretty...hungry. So I started feeding it twice a day: morning and evening. I noticed with twice daily feedings, the starter looked more lively by the end of the day. It's possible, though, that if I had just increased the size of the one feeding, that would have fixed the problem.

But enough discussion. Here's my process so far for maintaining sourdough starter:

At the first feeding to maintain the starter, I took a clean, empty, quart sized mason jar. I measured the weight of it, in grams, and wrote that tare weight on a piece of masking tape, and stuck that on the jar.

I put the jar on the scale, zeroed the scale, and added 20g of sourdough starter to the jar.

I measured 40g of flour (be sure to feed the starter gluten-free flour mix, NOT the grain-free one in American Classics Reinvented), dumped that in the jar with the starter. I measured 40g of non-chlorinated, room-temperature water, and I dumped that in the jar with the starter and the flour. I mixed all of it up vigorously, and screwed the lid on LOOSELY.

In the evening, I weighed the jar and removed all but 20g of the sourdough starter. This was easy to do, because I already knew how much my jar weighs when it is empty. (Pretend your empty jar weighs 420g . Put the jar on the scale and keep removing starter until the scale reads 440g. Now you have 20g of starter in the jar.) I then added 40g of flour and 40g of non-chlorinated, room-temperature water, mixed it all vigorously, and screwed the lid back on LOOSELY.

Then I just repeated this process--keeping 20g of starter, and adding twice that amount of flour and of water at every feeding. I composted the starter I removed. The thing about sourdough is that you have to remove some of the starter at every feeding or else you and your kitchen will quickly become overwhelmed by sourdough starter. Also, removing excess starter helps to keep the microbe population in check and control the level of sour in your baked goods.  

A few feedings in advance of when I would be baking again, I began to build up the size of my starter by increasing the size of the feedings. I kept 20g of starter, but fed it 60g of flour and 60g of water. And at the next feeding, I kept 30g of starter and added 90g of flour and 90g of water. At that point, I had more than enough starter for my recipe plus 20g to maintain in the jar.

This week, I'm experimenting with keeping the starter in the fridge. I fed the starter a couple of days ago, let it hang out on the counter for a couple of hours after the feeding, and then I put the jar in the refrigerator. My plan is to take it out of the refrigerator and revive it with a few feedings before our next baking day. 

Just Plane Fun

"Mom. Why does everyone keep asking me if my clownfish wheelie bag is called 'Nemo?'"

Wyatt has a terrific little wheelie bag that is shaped like a clownfish, and it always draws remarks at the airport. This year, the first to comment on the bag was a TSA Security Guard, who asked, "Is that Nemo?" Had he instead said, "Hey, buddy! That's a great bag. Is that a clownfish?" Wyatt would probably enthusiastically responded that yes, it was, and he would have shown him the zipper and the retractable handle. Instead, Wyatt looked at him like he was insane. 

Two more people asked "Hey! Is that Nemo?" as we waited for our plane. Wyatt gave them both the same quizzical look, as I explained, "No, it's just a clownfish." They followed-up with an incredulous, "Really?" So I assured them, "Yes, really. It's just a clownfish,"

These are the kind of exchanges that happen to us regularly, because Wyatt doesn't watch television or movies, and he doesn't play video games. Connecting with Wyatt over pop-culture doesn't work at this point in his life.

Our decision to wait to expose Wyatt to media has been a very conscious decision, and it has proven challenging at times. Our decision is based on many of the reasons discussed in this great post and thought-provoking podcast episode, and we're incredibly glad we have taken this approach. But when people find out that we're "those no-media people," we usually get one of three reactions. The first is, "You're crazy!" The second is, "So what are you saying? I'm ruining my kids by letting them watch their favorite programs?" And the third is a sort of sheepish, "Oh. We don't let ours watch THAT much..."

We are not crazy. This approach is working for us, and we feel that we're reaping the benefits of having a child with a rich imagination who enjoys independent play. And our choice has nothing to do with what anyone else is doing with their own kids. The statement, "Wyatt doesn't watch TV or videos," when offered to explain his blank stare at a pop-culture reference, is not a judgment of anyone. But it's no wonder that people sometimes take it negatively. Media in childhood is a hot button issue. At least a few times a year, there's another article telling parents that children should have less media exposure. And infuriatingly, those reports usually offer exactly zero suggestions on how to cut back. (If you're interested in cutting back on media for young children, there is a helpful post from Janet Lansbury that you can check out here.)

Anyway. Long flights are challenging for everyone, but especially young children and the parents traveling with them. And it's easy to assume that entertainment in a confined space like an airplane requires screens. But it didn't for us. The low-tech stuff still works. 

This year, Wyatt was old enough to help decide what to put in his wheelie bag to pass the time on the plane. Here's how we amused ourselves on our flights:


Aside from the mandatory safety video, the only thing we watched on a screen was the map showing the plane's progress across the country. On our flight to Boston, a child was seated in front of Wyatt and the poor kid kept dropping his toys. So Wyatt spent a lot of time retrieving the toys for him, trading toys through the crack between the seats, or playing on his own with his cars or other things on the tray table. He also listened to some music on his headphones plugged into my 12-year old iPod, until the device finally died, giving us a terribly sad face on its big grey screen. I built him into a fort with an old swaddle blanket we always travel with. And I tried doing a couple of string figure games with him, but they weren't that fun--maybe in a few more years. On the flight back from Boston, Wyatt did some drawing, reading, resting, and listened to a couple of audio stories from Sparkle Stories (which I managed from my phone, since the old iPod was dead). I didn't get to read a book (or watch anything myself, obviously), but I did end up getting a short nap and I made a lot of progress on a knitting project. I also had some pretty fun conversations with my kid.

We brought and ate healthy, delicious snacks we rarely get at home. Plane snacks!

And we spent lots of time looking out the window, especially on take-off and landing.


In Praise of Paneer

"Wyatt. Stop eating the cheese! We have to press it." 

"But it's SO GOOD!"

While we were waiting for the Shankleesh, we decided we had plenty of time to make paneer according to the recipe in David Asher's The Art of Natural Cheesemaking (White River Junction: Chelsea Green, 2015).

Paneer is a special kind of cheese that is made without animal rennet. Heat and acid are what allows the milk to curdle, and then those curds can be strained and pressed into a block of cheese. Because of the way paneer is made, it doesn't melt when you heat it. As a result, you can cook it in sauces or barbecue it, and it will hold its shape.

The first step in the recipe is to heat the milk to boiling (which would kill most of the beneficial bacteria in raw milk). We therefore opted for pasteurized milk in this recipe. This recipe also requires a cheese press, which of course we don't have. I learned from a little bit of research that cheese presses start around $200, so buying one is not a good option for us. There are also instructions available online so you can build your own, so maybe we can do that in the future.

Fortunately, the author suggested an easy solution to the cheese press problem: two empty plastic yogurt tubs. You punch holes in one of the tubs from the inside out, put your cheese in the tub with holes, and then you pour the warm whey into the intact tub, which you place on top of the cheese. The tub of warm whey helps to press out the rest of the whey from the cheese. As much as I try to avoid plastic, this was our best option for making paneer. Wyatt and I went out and bought the cheapest yogurt we could find, for the containers it came in, and took it from there.

Here's how we made paneer:

The recipe advises using fresh lemon juice, not bottled, which is my preference anyway. So we squeezed lemons, and then heated the milk. After the milk had boiled, we poured in the lemon juice and watched curds magically appear. We then gently transferred the curds from the whey with a slotted spoon into a colander, seasoned the curds, and set up our press on a rack, over a baking dish. The cheese sat in the press for a few hours, and it was easy to remove from the mold when it was time to eat it.

We tasted the paneer with and without salt, and we concluded that salt enhances the flavor dramatically. We added some herbs to fancy it up, and in the spirit of international cheesemaking, we went with herbs de provence. It tastes terrific.

We stopped by Rainbow today to tell Andy all about our cheesemaking and give him some of the paneer. Wyatt bounded over to him to give him his present, and Andy was so gracious. He remarked that he would bring the cheese to his cheese meeting in a few minutes to share with his coworkers. (No pressure there...)

Gluten-Free Wild Sourdough Bread: We did it!

"Is that MY loaf of bread? It looks so good...THIS BREAD IS SO GOOD! I need two pieces, please. Two pieces with extra butter."

Making yogurt and baking sourdough bread were my first forays into fermentation. When Wyatt was about eight months old or so, I was really into baking sourdough. And I got really good at it. I bought my culture from Cultures for Health. I baked bread all the time, we had sourdough pancakes every Sunday, and I cared for the culture almost like a pet. 

But just after Wyatt turned a year old, we learned that he (and we) were gluten-intolerant. That knowledge sounded the death knell of the sourdough starter and the end of the Bread Extravaganza of 2012. Over the next couple of years, I tried a few recipes here and there for gluten-free sourdough bread, but they mostly produced dense, boozy-smelling bricks. Awful stuff. Since then, we've tried various bakeries' gluten-free breads, and they're great in a pinch, if toasted. But I don't love the texture that xanthan and guar gums give gluten-free baked goods, so we don't eat commercial breads (or any bread) that often.

When I saw that Gluten-Free Girl's American Classics Reinvented included a true sourdough bread recipe, I pre-ordered the book. I figured that if the recipe worked, the entire book would have been worth buying.

We got our book on Tuesday, and we started our sourdough on Wednesday.* We baked on Monday.

Here's what we did:

After mixing teff flour and non-chlorinated water, we let the mix sit for a day, and then began the process of, every day, removing most of the previous mixture and adding more flour and water. After a few days, I made pancakes with some of the "extra" starter. The first time I made pancakes, I used a sourdough pancake recipe I had found. But by the second time, I had read Sandor Katz's more relaxed approach to sourdough in the Art of Fermentation, and I made up my own recipe. I took 2 cups of the starter, added a teaspoon of baking soda (the baking soda binds with some of the lactic acid, making a slightly sweeter pancake), a tablespoon or so of coconut flour and two beaten eggs. The pancakes were terrific.

Making the actual bread was easy. It's gluten-free, so there's no point in kneading it. You could knead all day and you'll never create the gluten network of a traditional bread! After shaping and a final proof, we baked each loaf in a dutch oven, with a little steam of water at the end of baking time.

If you like the idea of gluten-free sourdough bread, I think you'd be smart to pick up a copy of American Classics Reinvented and start your sourdough right away. 

If you want to try building your own wild sourdough starter but don't need it to be gluten-free, check out this post from Wild Fermentation, and maybe consider adding some teff flour to your mix to speed things along.

IMG_3380.jpg


Meanwhile, we have a new culture in the house. We are both taking a breather from baking right now as I learn what our new pet needs to stay bubbly. 


*There was a point this weekend where we had Shankleesh draining, paneer being pressed, sourdough starter bubbling, and pizza dough rising. It was a busy and somewhat messy weekend over here.


Waiting for Shankleesh

"Look, Mom. The cheeseballs are waiting their turn in line to go roll in the dirt."

Making food through fermentation takes awhile. And even though you can ballpark how long the process will take, you can't predict exactly when it will be done when you start. Take, for example, the Shankleesh we have just put up to age. This is the second recipe we undertook from David Asher's The Art of Natural Cheesemaking (White River Junction: Chelsea Green, 2015). We started this cheese last Tuesday, and we just put it up to age today, a couple of days later than anticipated.

The recipe for Shankleesh calls for extra firm and dry Dream Cheese, which is explained earlier in the book. Dream cheese is basically cheese made from yogurt that you hang in cheesecloth until the whey has drained out. I actually remember making yogurt cheese as a kid, back when the goal was low-fat everything. Yogurt cheese promised to be a low-fat cream cheese, and we tried making it. The day the yogurt took to drain seemed never-ending, and when it was finally time to taste the cheese, I remember feeling a bit disappointed. After all of that waiting, the cheese tasted okay, but it was pretty tart, and not at all like cream cheese. 

We could have hung homemade yogurt to start our Shankleesh, but David proposed an alternative recipe for Dream Cheese, entitled "You Can't Do That With Pasteurized Milk Cheese." He wrote that it may be the oldest cheese ever made. We made that one, of course.

We started with good raw milk,* which according to the recipe, should take about two days to clabber. "Clabber" is a word that doesn't come up much anymore, likely because most milk is now pasteurized, and you can't make clabber out of pasteurized milk. To make clabber, you leave raw milk out at room temperature, and the beneficial bacteria present in the milk will make the milk sour and thicken it into what's called clabber. Pasteurized milk doesn't work this way--it just rots at room temperature.

Our first step was to pour our raw milk into a jar and let it sit on the counter. Then, we waited. We checked the milk every day, stirring with a spoon to check for thickening and to see what it smelled like. Every day, it started to smell a little bit more tangy. By Day 2, there was no clabber. Not on Day 3, either. By Day 4, I was starting to get impatient, and I wondered if the temperature of our kitchen was too cool. It was a warm day, so I put the jar out in the sun on the deck and in a couple of hours, we had clabber.


Here's how we made Shankleesh: 

To make the cheese, we pulled out our cheesecloth (real cheesecloth, not the loosely woven stuff from the grocery store) and lined a colander with it. In went the clabber, and we suspended the clabber by a knot on a spoon balanced over a tall pot. After a day, the whey had drained, and we had curds. We salted the curds, and hung them again for another day of draining. Our next task was to form the cheese into balls and then dredge them in za'atar. I have to say, the cheese cloth had gotten pretty stinky by this step. Wyatt almost bailed on the project the smell was so pungent. The balls then went into a jar, and we covered them in olive oil. 

Our jar of cheese is now resting comfortably in the cool temperature of our garage, and it will stay there for a month. We put a sticker on the calendar so we can have a visual countdown to the day when we can eat it. Tom Petty and The Heartbreakers got it right: The waiting is the hardest part.

*Raw milk, its history in the United States, and the politics that accompany any discussion of raw milk, are as fascinating as they are polarizing. Many states do not permit the sale of raw milk. Fortunately, California is not one of those states, and I've now got Rainbow Coop's delivery schedules of raw cow and goat's milk (the chapter on chèvre is coming!) so we can purchase the freshest possible milk to make our cheeses. You may heartily disagree with my decision to move forward with a project that requires using raw milk, and in this preparation, will almost certainly age for less than 60 days. Your hearty disagreement is fine with me. But please express it respectfully.

The Art of Natural Cheesemaking: Homemade Crème Fraîche

"Dad! Guess what? Mom emailed the man who writes the stories about cheese in his book, and you know what? He sent her a knitting pattern to make cheesecloth!"

About six weeks ago, while we were cooking dinner, Wyatt said, "Mom. How do you make blue cheese?" I provided a vague description. He quickly exposed my lack of knowledge by asking me "Why?" and "How?" a couple of times, at which point I admitted we'd have to look up how they make it. Wyatt then said, "Well, I want to learn how to make cheese." I responded that we had already made it, by making cottage cheese and cream cheese. He gave me a somewhat withering look and said, "I want to make cheese like Andy gives us at Rainbow." 

It would be amazing to make cheese like Andy gives us at Rainbow. So I asked around about classes for kids (no luck) and started researching cheesemaking books.

The day before we left for Massachusetts, the book I had chosen for our adventure in cheesemaking, The Art of Natural Cheesemaking, by David Asher (published by Chelsea Green) arrived. After reading the introduction, I decided that Wyatt and I are not just going to dabble in cheese from this book. We are instead going to "Julie and Julia" The Art of Natural Cheesemaking. Yesterday, I emailed the author, David Asher, to let him know:

I plan to chronicle [my four-year old son's and my] cheesemaking adventures [on my blog], giving you appropriate credit. I want to support your work, help bring awareness to your approach, and I want you to sell millions of copies of your book. Would you be okay with my writing about what we're doing and how we're doing it...Or what are your thoughts around how you'd prefer I approach this project? 

I was not expecting to hear back from David quickly (or at all, really), but he wrote back within the hour. As it turns out, he has also been to Rainbow several times and thinks that we've totally got this: 

[I] was just [at Rainbow] a couple of weeks ago, perusing the cheese selection.  And, yes, I can tell you and Wyatt that with good milk, kefir and the right touch you can make cheese just as good if not better than what's in their display! I'd love to see a chronicle of your experiences with the book...Just be sure to acknowledge me and Chelsea Green. And also, take very nice photos to show how good your cheeses look! 

We've got access to great milk, we keep and use kefir grains already, and we'll look to cultivate the right touch for cheese. Also, I'm all about giving credit where credit is due, and bad food pictures depress me. So I think we are good to go.

But there's more! David also loves knitting. He sent me his draft pattern for a knitted du-rag he likes to use for hanging cheese. The pattern uses 500 yards or so of sport linen yarn on size 2 needles, so it will take me awhile. Nevertheless, as I told him, knitting cheesecloth seems infinitely more doable to me than sourcing my own rennet from the fourth stomach of a freshly slaughtered calf (a recipe for which is also included in his book). 

Wyatt's and my first project* was to make crème fraîche. Here's how we did it:

First, we poured a pint of cream into a mason jar, and then we added some kefir grains. We covered the jar loosely with the lid and put it out of direct sunlight on the kitchen counter. After about a day, we strained the thickened cream from the grains. Easy! Making the blueberry buckle was actually way more difficult than making crème fraîche.

As is often the case when it comes to food, Wyatt was right. Crème fraîche, especially homemade, is even better than sour cream.

*We make kefir already, and the recipe in David's book is the same as the one we use daily, so we skipped that one.

Drop Spindles and Spinning Wheels

"Oh, that's great yarn you made! Mom. When are you getting a spinning wheel? Soon, yes!? But I do NOT like the smell of that wool. I know what the problem is: maybe they didn't filter it?"

Wyatt and I are just returning from ten days at my parents' house in Massachusetts. That's a new personal record for all of us. In addition to our crab apple jelly/jam concocting, we enjoyed an amazing day trip to Wingaersheek Beach with friends, blueberry picking, and visits with family. Most days, though, Wyatt stuck himself firmly to his grandparents in the morning and took the day from there. He did some work in the wood shop and garden, emptied the wading pool with water shooters, did construction projects in the sand box, tirelessly assisted in mowing the lawn on the riding lawnmower, helped with errands, and chased the dog around the yard.

My parents' place is pretty terrific, especially when you're four, and it's summertime. As an adult, I recognize I am really fortunate to have grown up there. At the same time, I vividly recall how I couldn't wait get out of my hometown, go somewhere far away, and do something awesome.

More than a month before we were scheduled to leave, I was looking at the ten days blocked-out on our calendar, and I noticed a teenager's scowl beginning to tug at the corners of my mouth. I realized I was having a tough time shaking my view of our destination as "boring." I wondered if I could plan a way to experience or learn something new while I was visiting. I started to think about New England, New Englanders, and the pleasant attributes make the people and area special. During the weeks leading up to our trip, Wyatt began to comment on all the things he was looking forward to seeing, including all of the "forests." To him, there are forests everywhere, including on the side of all the roads. 

I began to think about open space, forests and then farms, and I started to research whether there were any hyper-local farms or yarns I could check-out while I was in town. I didn't find any.* I next considered attending a fiber-related workshop. A few online searches later, I found Sheila Bosworth, who works only minutes away from my parents' house, and the Fiber Loft just down the road in Harvard. Suddenly I knew what I wanted to do: I wanted to learn to spin wool in New England.

I contacted Sheila and the Fiber Loft, and both of them had good news: they would teach me to spin! Sheila would lend me a bobbin and teach me the drop spindle technique, and the Fiber Loft had room for me in a day-long beginning wheel spinning workshop. Fortunately, my parents were up for some extended grandchild time, so I was free to make plans.


My first lesson was with Sheila. I knew I was in great hands when she looked at my first wonky yarn attempt and told me, "Oh my! Look at that! You've made bouclé! I can't even do that anymore. People pay good money for artistic yarn like that." She gave me wonderfully attentive instruction, as well as little spinning mantras to say to myself to help with bringing the right amount of wool to the spindle. I bought one of her gorgeous spindles, and I left with the intention to follow her admonition to practice for 15 minutes a day.


My second lesson was just over a week later, at the Fiber Loft, with Ann Corbey. Our class was a group of four women (we all arrived solo), and none of us had ever spun wool before. Ann brought us fleece from her sheep, Lydia. 

We started with Lydia's skirted, unwashed fleece, and we learned to card it.

Once we had carded the fleece into rolags, Ann showed us how to spin it "in the grease." We worked with Lydia's wool from 10:00 am until 4:00 pm. The time flew, we all chatted, learned, messed-up, and fixed our mistakes. I left with a ball of pretty good looking handspun wool and a deep admiration for Ann and her gracious, fun approach to teaching. It was magical to watch my fingers feed fluffy rolags of wool I had just carded into a wheel I was powering with my foot and have yarn come out the other end. Bonus: my hands got a lanolin treatment. 


I was hoping I'd have fun with these lessons, but I wasn't expecting I'd love spinning or be any good at it. I certainly wasn't expecting to leave these lessons plotting how I might find a reasonably price, pre-owned, (double treadle?) Louët spinning wheel so I could take up yet another craft. But I do love it, and I am plotting. In the meantime, I have my little drop-spindle to keep me busy.

My next task will be washing and blocking my yarn...

*I'm convinced there are plenty of little local farms to visit, but the farms are not commercial enough to bother with a website.